Clicky

20230403

Building an FTP server: from zero to hero in less than 3 minutes

Requirement: a simple FTP server, low on energy and with cheap hardware. This is my IPcam streams- and snapshot server.

A secondhand Archer C7 is available for (less than) $10 or even for free. Check your attic or eBay for compatible hardware. Make sure you have the 12VDC/2Amp power supply. You have to figure out how to put OpenWRT on the Archer C7 (or on other compatible hardware. Note: minimum 16MB flash memory is required). There are excellent webpages ready to teach you how flash a router with  OpenWRT firmware.


TP-Link Archer C7 + USB disk

FTP server build steps:

  1. Install FTP server and disk management software;
  2. Configure the USB disk;
  3. Configure the FTP server.

Prerequisites:

  1. Put OpenWRT on the Archer C7;
  2. Make sure:
    • That the router has Internet access;
      Tip: configure the Archer C7 WiFi adapters as a WiFi Client (Network > Wireless > Scan > Join Network > WPA passphrase > Submit > Save > Save & Apply);
    • The USB disk is attached to the C7;
    •  Computer to connect to the C7, to show the OpenWRT webpages and an SSH client (e.g. putty).

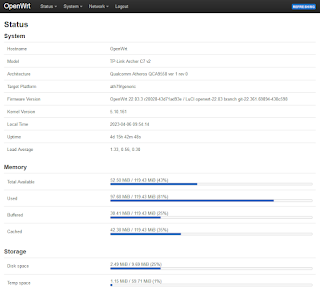
This is the webpage you need to see, to get started:

All done? Here we go:

Logon to the Archer C7 (SSH client, e.g. putty) and install the software. Copy the script below and paste the next lines in your Putty session. You will see command responses.

WARNING: you WILL lose data on the USB disk, even if you do not want that. Don't blame me, you are on your own!  

#--- FTPserver20230428

sleep 1
clear

#--- Script start.

#--- Check Internet connectivity...
ping -c 4 9.9.9.9

#--- Update list of available software...
opkg update

#--- Install all software and prepare disk partition...
#--- USB support...
opkg install kmod-usb-storage kmod-usb-storage-uas usbutils
#--- Storage support...
opkg install block-mount e2fsprogs f2fs-tools kmod-fs-f2fs kmod-fs-ext4 sgdisk
#--- FTP server...
opkg install vsftpd
#--- User account management...
opkg install shadow-useradd
 
#--- Prepare harddisk/SSD/USB disk...
lsusb -t
block info | grep "/dev/sd"
sgdisk -o /dev/sda
sgdisk -N 1 /dev/sda
sgdisk -p /dev/sda
sgdisk -c 1:FTPstorage /dev/sda
sgdisk -i 1 /dev/sda

#--- Create filesystem (choose one)...
#--- USB stick/SSD...
# echo y|mkfs.f2fs /dev/sda1

#--- Harddisk...
echo y|mkfs.ext4 /dev/sda1

#--- Mount the disk automatically after reboot of the Archer C7...
block detect | uci import fstab
uci set fstab.@mount[-1].enabled="1"
uci commit fstab
uci set fstab.@global[0].check_fs="1"
uci commit fstab

#--- Mount the disk now...
block mount
mount | grep "/mnt/sda1"

#--- Create the FTP account and set the password...
useradd -r -s /bin/false -d /mnt/sda1/ftp ftpuser
passwd ftpuser -d
mkdir /mnt/sda1/ftp
chown ftpuser /mnt/sda1/ftp
ls -al /mnt/sda1

#--- Create FTP server configuration file...
echo "
background=YES
listen=YES
anonymous_enable=NO
local_enable=YES
write_enable=YES
local_umask=022
check_shell=NO
local_root=/mnt/sda1/ftp
session_support=NO
" > /etc/vsftpd.conf

#--- Restart the FTP server and check if the FTP server is running...
/etc/init.d/vsftpd restart
ps | grep ftp

#--- Create scheduled task to remove FTP files older than 30 days...
echo "#--- At midnight, delete files older than 30 days...
0 0 * * * find /mnt/sda1/ftp -type f -mtime +30 -exec rm -rf {} \;"| crontab -

#--- Set hostname...
uci set system.@system[0].hostname=FTPserver
uci commit
echo $(uci get system.@system[0].hostname) > /proc/sys/kernel/hostname

#--- Set FTP user password...
passwd -a sha512 ftpuser
 

That's all. It takes ~3 minutes to build this configuration.

Hardening:

  • You might need to configure the "LAN" interface to a fixed IP address on your network, so that the FTP server can be accessed by other devices on your network. Connect the Ethernet cable to port LAN1;
  • There is NO security on this FTP server. Anyone that knows the FTP client username/password can access the FTP server files. Username and password will go unencrypted over the network.We can prevent that the FTP server has Internet access: set the Default Gateway to 127.0.0.1 or a not used IP address in your home network;
  • Set a password for the root user (System > Administration);
  • Remove the WiFi client settings (Network > Wireless > Remove).

Performance: 

Upload speeds of ~10Mb/s (to a USB thumb drive) or ~19MB/s (2.5" hard disk)  are possible. 

Energy:

An Archer C7 with a USB hard disk consumes between 4.4W (in rest) and 6W (busy).

Build console output:

 To test the server, you can use Filezilla to connect to the FTP server and test upload/donwnload/delete:


78:5A:F1:DC:BC:7D:14:0B:C3:F5:14:8C:FB:DF:7E:FD:7F:9C:7C:F9:BA:AA:84:0C:52:48:30:01:25:38:65:FC

20230319

Create (self signed) EC keys and certificates

There are scenarios where you want to use self signed certificates for a client-server application. A typical example is when you run OpenVPN from low performance hardware. In that case Elliptic Curve key material might improve the overall performance. 

The next script produces certificates and private keys for one server and 1-n amount of clients. The script also calculates the SHA256 hash of the certificates. We need that for the project of my next post.

Script usage:

C:\Scripts\> createBridgeKeysAndCerts [client certificate count]

E.g.:

C:\Scripts\> createBridgeKeysAndCerts 3

This will produce the next files:

03/19/2023  02:19 PM               684 bridgeClient1.crt
03/19/2023  02:19 PM               312 bridgeClient1.key
03/19/2023  02:19 PM               116 bridgeClient1.sha256
03/19/2023  02:19 PM               680 bridgeClient2.crt
03/19/2023  02:19 PM               312 bridgeClient2.key
03/19/2023  02:19 PM               116 bridgeClient2.sha256
03/19/2023  02:19 PM               684 bridgeClient3.crt
03/19/2023  02:19 PM               312 bridgeClient3.key
03/19/2023  02:19 PM               116 bridgeClient3.sha256
03/19/2023  02:19 PM               680 bridgeServer.crt
03/19/2023  02:19 PM               312 bridgeServer.key
03/19/2023  02:19 PM               116 bridgeServer.sha256

This the script:

@echo off
goto :BEGIN

    Script: createBridgeKeysAndCerts.bat
    Version: 1.0
    Date: 18-Mar-2023
    Prerequisite: OpenSSL (https://slproweb.com/download/Win64OpenSSL_Light-3_1_0.msi)

:BEGIN
cls
cd /D "%~dp0"

echo *** OpenVPN Bridge config builder...

set openssl="C:\Program Files\OpenSSL-Win64\bin\openssl.exe"
if not exist %openssl% goto :EOF

set clientCertCount=1
if %1.==. goto :START
    echo %1| findstr /r "^[1-9][0-9]*$">nul
    if %errorlevel% equ 0 set clientCertCount=%1
:START

setlocal EnableDelayedExpansion
pushd .

md .\keys >nul 2>nul
cd .\keys

REM --- Generate bridgeServer and bridgeClient keys and certs...
echo.
echo *** bridgeServer cert + key...
%openssl% ecparam -out secp384r1.pem -name secp384r1
%openssl% req -x509 -newkey ec:secp384r1.pem -keyout bridgeServer.key -out bridgeServer.crt -nodes -sha256 -days 3650 -subj "/CN=bridgeServer" >nul 2>nul
%openssl% x509 -fingerprint -sha256 -in bridgeServer.crt -noout > bridgeServer.sha256

echo.
echo *** bridgeClient certs + keys...
for /l %%i in (1,1,%clientCertCount%) do (

    echo *** Processing client %%i...
    %openssl% req -x509 -newkey ec:secp384r1.pem -keyout bridgeClient%%i.key -out bridgeClient%%i.crt -nodes -sha256 -days 3650 -subj "/CN=bridgeClient%%i" >nul 2>nul
    %openssl% x509 -fingerprint -sha256 -in bridgeClient%%i.crt -noout > bridgeClient%%i.sha256

)


del /q secp384r1.pem >nul 2>nul
echo.
echo *** Keys and certs created:
dir /s | find "bridge"

REM --- Calculate and display SHA256 hash of cert(s)...
echo.
for /f "tokens=2* delims==" %%i in ('%openssl% x509 -fingerprint -sha256 -in bridgeServer.crt -noout') do set hash=%%i
echo *** bridgeServer hash : %hash%
echo.
for /l %%i in (1,1,%clientCertCount%) do (

    for /f "tokens=2* delims==" %%i in ('%openssl% x509 -fingerprint -sha256 -in bridgeClient%%i.crt -noout') do set hash=%%i
    echo *** bridgeClient%%i hash: !hash!

)

setlocal DisableDelayedExpansion
popd


20230225

Click to run Powershell script

Sometimes it is more convenient to start the Powershell script by just clicking the filename in Windows Explorer. 

Here are a couple of methods to start a Powershell script by clicking the filename or just typing the script name in a command shell.

Method 1: the Shortcut

Create a new shortcut on the Windows desktop or in some folder with the next properties:

  • Create a shortcut on the desktop or in a folder with the next "Target" value:
C:\Windows\System32\WindowsPowerShell\v1.0\powershell.exe -noprofile "%1"
  • Associate PS1 files with this shortcut.

It will run the Powershell script but the console will be closed on completion. You may want to add a Start-Sleep or Read-Key command at the end of the script to observe the script output.


Method 2: using a Batch file

  • Create a Batch file (c:\Scripts\psRun.bat) with the next content:
@cmd /k powershell -noprofile "%1"

  •  Associate PS1 files with this Batch file.

Now the script runs and leaves the Console open, so the script output can be inspected.


Method 3: embed Powershell code in Batch file

A Batch file will run when clicked. So when we embed the Powershell code in a Batch file we can run the Powershell script from the Batch file. In this case we do not have to change the file association of PS1 files.
 
Running this Batch file:

@echo off
set outFile=%temp%\temp.ps1
del /q %outFile% >nul 2>nul
certutil -decode %0 %outFile% >nul
cmd /k powershell -noprofile -file %outFile%
goto :EOF
 
-----BEGIN CERTIFICATE-----
d3JpdGUtaG9zdCAiKioqIEhlbGxvIHdvcmxkIg0KU2xlZXAgMw==
-----END CERTIFICATE-----

Will give this output:

So how does it work? The Powerschell script is converted to Base64. The Windows utility CERTUTIL is used to encode the Powershell scrip to Base64 and all the script will be between the BEGIN/END certificate markers. This is used by CERTUTIL to recognize the code that needs to be translated back to Powershell code.

So the manual steps to create a script like this is:

1. Use the Batch file decoder code

@echo off
set outFile=%temp%\temp.ps1
del /q %outFile% >nul 2>nul
certutil -decode %0 %outFile% >nul
cmd /k powershell -noprofile -file %outFile%
goto :EOF  

2. Convert the Powershell script to Base64

C:\> certutil -encode HelloWorld.ps1 HelloWorld.ps1.b64

 3. Append the HelloWorld.ps1.b64 output to the decoder code and save it as helloWorld.bat


To automate the whole process you may use the next script. Save as: makeBatchFromPowershell.bat:

@echo off

REM --- Usage: %0 {filenam}.PS1

REM --- Variables...
    if %1.==. goto :EOF
    if not exist %1 goto :EOF
    set batchFileName=%1-.bat
    set psCodeBase64=%temp%\%random%-%random%.tmp

REM --- Encode the Powershell file in CERTUTIL's Base64 code...
    certutil -encode %1 %psCodeBase64% >nul
    if %errorlevel% NEQ 0 (
        echo *** Certutil error...
        goto :EOF
    )    

REM --- Part 1: Create batch file - decoder section...
    echo @echo off>%batchFileName%
    echo set outFile=%%temp%%\temp.ps1>>%batchFileName%
    echo del /q %%outFile%% ^>nul 2^>nul >>%batchFileName%
    echo certutil -decode %%0 %%outFile%% ^>nul >>%batchFileName%
    echo cmd /k powershell -noprofile -file %%outFile%% >>%batchFileName%
    echo goto :EOF >>%batchFileName%
    echo. >>%batchFileName%

REM --- Part 2: Append Base64 code to batch file...
    type "%psCodeBase64%" >>%batchFileName%
    del /q %psCodeBase64% >nul

REM --- Show resulting filename...
    echo *** %1 embedded into %batchFileName%


Tying it all together:


You may rename the helloWorld.ps1-.bat to whatever BAT filename you want.


Real Time Web Analytics